Its All About gradient..


What are gradients?
Well they’re not the slopes, for one. Instead, a gradient, in Photoshop terms, is a fill consisting of two or more colours blending together.
How do I create these gradients?
Creating one is rather simple really. To create a gradient, click on the gradient tool. The gradient tool is grouped together with the Paint Bucket Tool in the toolbox. If the Gradient Tool is not showing in the Toolbox, simply point to the Paint Bucket Tool, press down the mouse button and select the Gradient Tool from the fly-out menu. When the tool is selected, the gradient options appear on the options bar represented by several buttons. Click on the buttons for your desired style.
When the tool is selected, there will be a colour bar at the options bar. Use the colour bar to choose the gradient colours. Now indicate which layer you want to fill at the layer palette. Using the select tool, select the area you want to fill and finally draw the gradient by pointing the mouse to where you want the blending to begin and dragging the mouse to where you want your blending to end. And eureka! Your gradient is done.
What are gradient styles?
There are five styles available at the options bar when the gradient tool is selected. These styles are represented by the five buttons at the option bar. Styles include linear, angular, radial, reflected and diamond gradient.
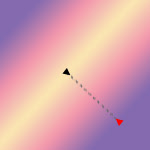
The linear gradient option is used to create diagonal, vertical and horizontal gradients only. For vertical gradients, drag the mouse from left to right whereas for horizontal gradients, drag the mouse from top to bottom. For diagonal gradients, simply draw a diagonal selection line.
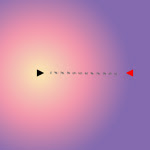
The radial gradient option creates a circular gradient. Click the mouse and drag it to whichever direction you want. After releasing it, the circular gradient will form. Your starting point will turn into the circle’s centre point and your ending point will be the outermost part of the circle.
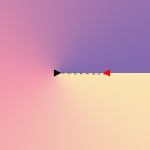
The angular gradient option creates a sweep of blended colours. Think of it as a clock face with a sweep second hand that the gradient flows from as it goes around. Start the mouse drag where you want the centre of the “clock face” to be; drag the selection line as if you were drawing the starting point of the clock’s second hand. When the mouse is released, the second hand sweeps counter-clockwise around the centre point and stops when it returns to where it began. The sweep begins with the left-most colour on the colour bar, and ends up with the right-most colour.
The Reflected Gradient option works the same way as the Linear Gradient, but it creates a mirror image as well. In other words, when you create the selection line, the gradient flows out in both directions from the centre point, rather than just in the direction you drag the mouse.
The Diamond Gradient option works on the same principle as the Radial Gradient. Start the mouse drag at the point where you want the centre of the diamond shape to be; release the mouse button where you want one of the points of the outermost diamond to be.
How do I select gradient colours?
Once the Gradient Tool is selected, the Gradient options appear on the Options Bar. The colour bar lets you set the gradient colours. If you click on the pull-down menu, you can select any of the displayed colour combinations. The circle button with the black arrow provides a fly-out menu with more gradient options. This menu lets you load more gradients, save modified gradients, load gradients shapes, rename gradients, and reset the gradient selection to Photoshop’s defaults.
How do I edit gradient colours?
If you want to make changes to one or more of the colours in your chosen gradient, you can click on it in the options bar to open the gradient editor dialog box.
And there you go! All the things you need to know to get started with the gradient tool. Enjoy folks!
Comments
Post a Comment